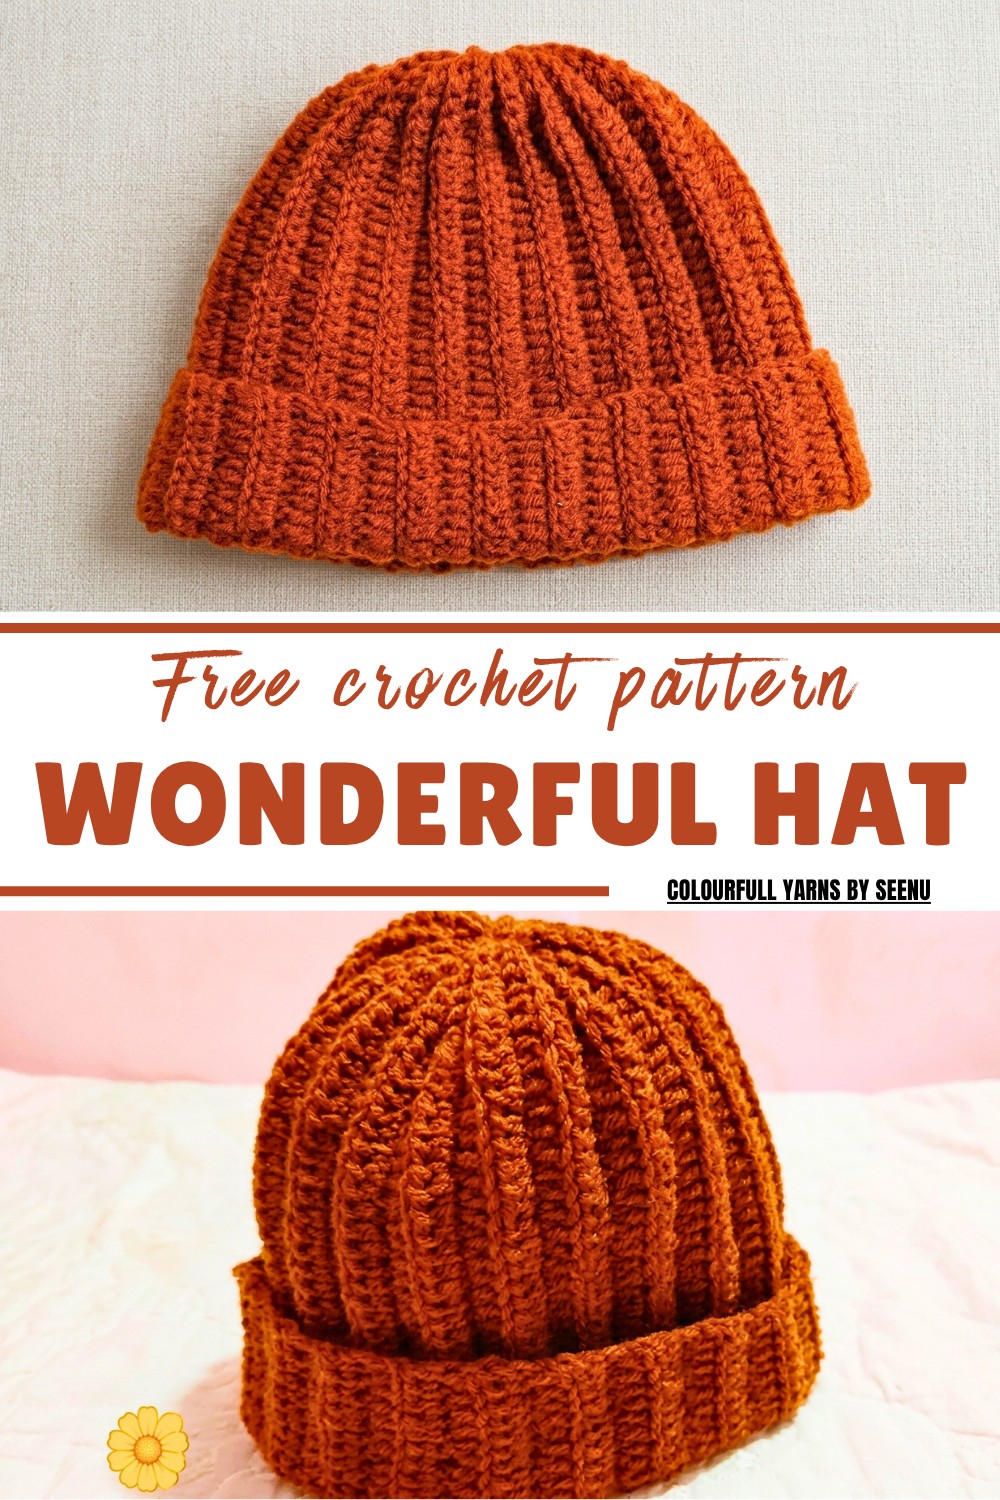
Budget-Friendly Free Crochet Hat Pattern for Any Season
Warm up your winter with this free crochet hat pattern that is simple, customizable, and perfect for gifting or staying cozy every day.
Nothing beats the satisfaction of making something both beautiful and practical with your own hands. A crochet hat is not only a timeless accessory but also a unique way to add warmth and personality to any outfit. Whether you’re chasing cozy vibes for cold weather or looking for a heartfelt, handmade gift, a free crochet hat pattern opens up endless possibilities. Ideal for beginners and experienced crocheters alike, it provides clear instructions to help you enjoy the process while crocheting a functional and stylish masterpiece.
Guidance to Stunning Crochet Hat Pattern Step by Step
With the ability to customize colors, sizes, and yarn textures, every hat becomes one-of-a-kind, reflecting your personal style or the tastes of someone special. This pattern isn’t just practical for keeping warm; it’s also a fantastic project for relaxation and creativity. Quick to complete, this makes excellent last-minute gifts and are a budget-friendly way to elevate your crocheting skills.
Whether made for yourself, family, or friends, crochet hats carry comfort and thoughtfulness that store-bought items simply can’t match. Plus, with this free pattern at your fingertips, you can easily turn simple yarn into a soft and cozy accessory that’s both fun to make and rewarding to wear or share.

Special Features
- Worked sideways in rows, then sewn into a tube
- Ribbed texture using back loop only
- Uses half double crochet (HDC) and single crochet (SC) only
- Top is closed with a simple running stitch (no shaping needed)
- Unisex and suitable for all ages (baby to adult)
- Brim formed by folding up the extra length
Difficulty level:
- Advanced Beginner
- You should know: slip knot, chain, single crochet, half double crochet, slip stitch, working in back loop only, basic seaming.
Tutor’s suggestions :
- Use looser stitches if you like a soft, stretchy fabric. Tight stitches are also okay, but will be less stretchy.
- Always count your stitches or use stitch markers at the row ends so the shape doesn’t distort.
- Adjust length and width using your head measurement for a perfect fit.
Materials
- Yarn: 4‑ply acrylic yarn (worsted weight / medium #4 suggested)
- Hook: 5 mm crochet hook
- Notions:
- Yarn needle
- Scissors
- Stitch markers (recommended for beginners)
- Sample color in video: Brown (you can use any color)
Abbreviations (US Terms)
- ch – chain
- sc – single crochet
- hdc – half double crochet
- sl st – slip stitch
- st(s) – stitch(es)
- BLO – back loop only
- FL – front loop
Size & Measurements
The hat is made as a rectangle, then seamed and gathered on top.
- Starting chain length (height of hat): about 10 in (≈ 26 cm)
- Rectangle width before seaming: about 18 in (≈ 46 cm)
How to measure for different sizes:
- Height (starting chain length):
Measure from the center/top of head down to:- just below the forehead + a bit above the nape (back)
- then add 2.5–3 in (6–7.5 cm) for the folded brim and ease.
This total is your starting crochet length in inches. Make a chain until it measures that length.
- Width (number of rows):
- Measure your head circumference around the forehead and back of head.
- From this measurement, subtract 2.5–3 in (6–7.5 cm) (because the hat stretches).
- Crochet rows until your rectangle width equals this reduced measurement.
- In the tutorial: head circumference is 21 in; they subtract 3 in and work until the piece measures 18 in.
Pattern Instructions
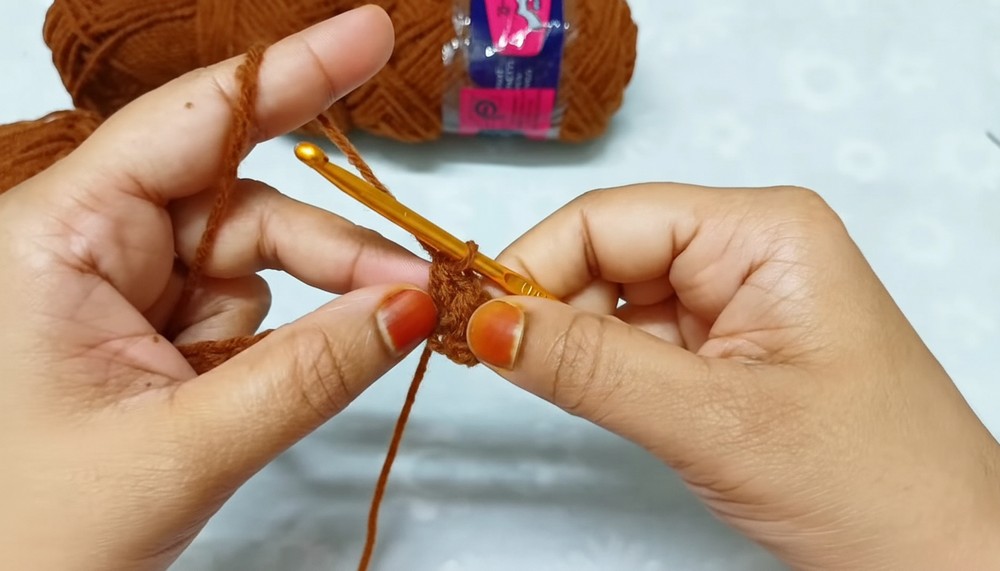
Step 1: Foundation Chain
- Make a slip knot on your hook.
- Chain until your chain measures about 10 in (26 cm) (or your required hat height).
- In the pattern, this is about 45 chains to get 10 in.
- Add 1 extra chain (this is a turning chain for the first row).

Note: The exact number of chains depends on your yarn, hook, and tension. Always go by measurement (10 in or your chosen height), not by stitch count alone.
Step 2: Row 1 – Base Row (SC & HDC)
You will work back along the chain:
- Skip the first chain from the hook.
- Into the second chain from the hook, work 1 hdc:
- Yarn over, insert hook into 2nd ch,
- Yarn over, pull up a loop (3 loops on hook),
- Yarn over, pull through all 3 loops.
- Place a stitch marker in this first hdc if you are a beginner (to mark the last stitch of the row).
- Hdc in each chain across, until only 5 chains remain at the end.
- In the last 5 chains, work 1 sc in each chain.
- You should have:
- hdc in approx. 40 chains
- sc in 5 chains
- Example: 45 foundation chains → 40 hdc + 5 sc.
- You should have:
This completes Row 1.
3: Row 2 – Back Loop Only (SC then HDC)
From now on, all rows are worked in back loop only (BLO).
- Ch 1, turn your work.
- In the first 5 sts, work sc BLO (1 sc in the back loop only of each of the first 5 sts).
- In the remaining 40 sts, work hdc BLO across (1 hdc in the back loop only of each st).
- At the last stitch, place a stitch marker if needed to keep track of row ends.
This completes Row 2.
4: Row 3 – Back Loop Only (HDC then SC)
- Ch 1, turn.
- In the first 40 sts, work hdc BLO across.
- In the last 5 sts, work sc BLO (1 sc in each of the last 5 sts).
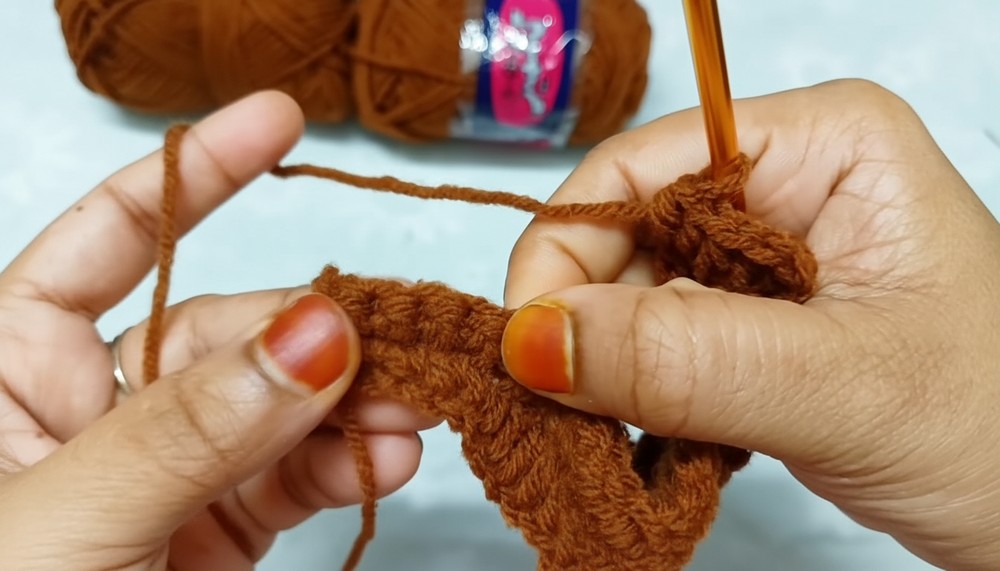
This completes Row 3.
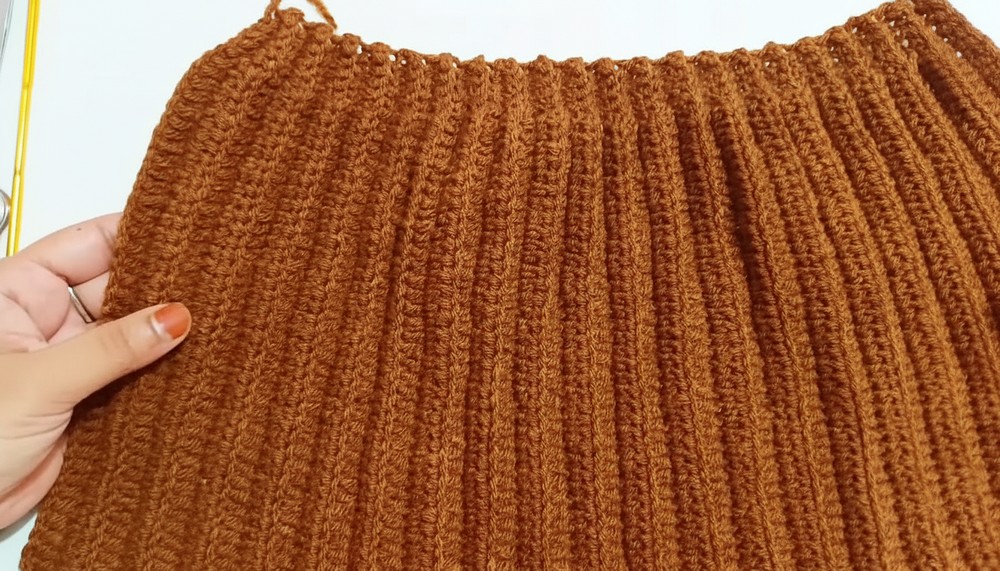
5: Repeat Pattern to Desired Width
- Repeat Rows 2 and 3 alternately, always working in back loop only:
- One row starts with 5 sc BLO, then hdc BLO to end
- Next row starts with hdc BLO, then 5 sc BLO at the end
- Continue repeating until your rectangle’s width (measured along the rows) equals your required width:
- That is: your head circumference minus 2.5–3 in.
- Continue until the piece measures 18 in (46 cm).
The result is a long ribbed rectangle. The area with 5 sc forms a slightly tighter rib that becomes the folded brim edge.
6: Seam the Sides Together
Now join the short sides to form a tube.
- Fold the rectangle in half, bringing the starting edge and last worked edge together, right side facing inside or outside (the seam is nearly invisible either way).
- Align the stitches so that each stitch on one side matches with one stitch on the other side.
- Insert your hook through the front loop (FL) of the stitch on the side nearest you, and the matching stitch on the opposite side.
- Work slip stitch (sl st) through both layers to seam:
- Insert hook into FL of first side st, and into the matching st on second side,
- Yarn over, pull through all loops on hook (sl st).
- Continue sl st across the entire edge, making sure stitches do not shift (always matching stitch to stitch).
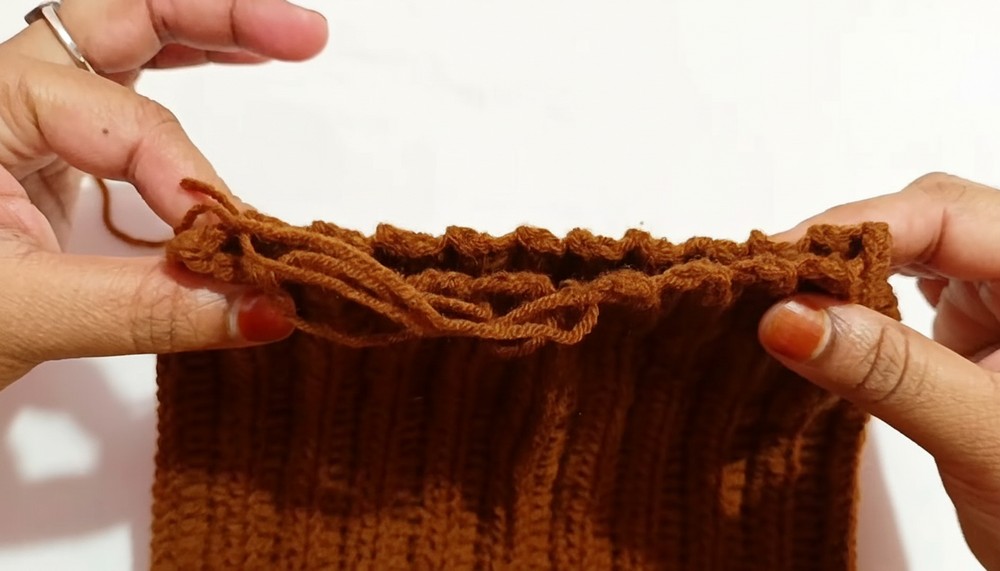
You now have a tube. The seam is neat and barely visible.
Fasten off at the end of the seam, leaving a long tail of yarn for closing the top (if you haven’t already).
7: Prepare for Closing the Top
- Before cutting the yarn from the seam, chain 1, then cut the yarn leaving a long tail (enough to go around the top once or twice).
- Pull the tail through the loop and tighten.
- Find the initial slip knot tail from your foundation chain; tie this together with the seam tail for extra security.
- Thread the long tail onto a yarn needle.
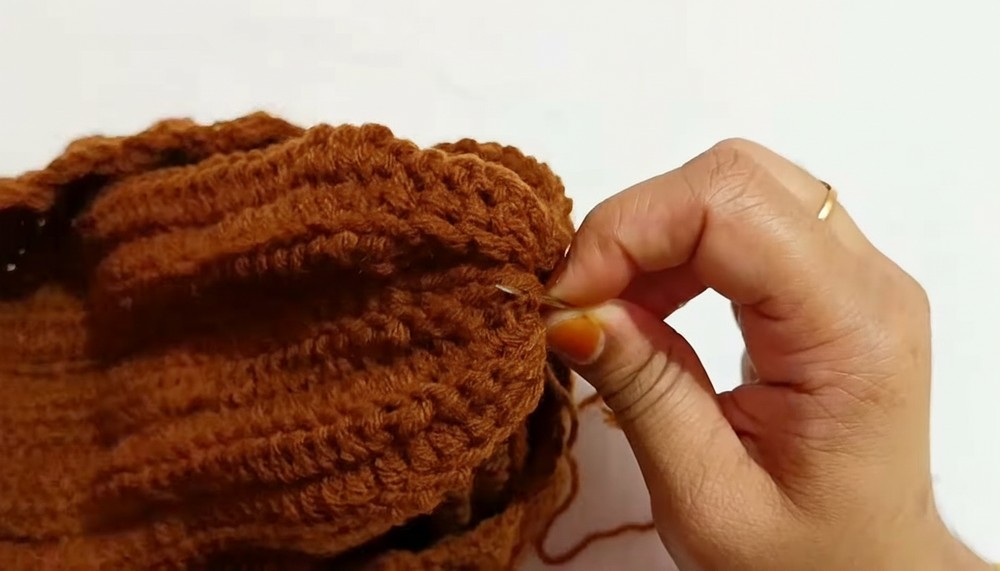
8: Close the Top (Running Stitch)
You will now gather the top of the hat:
- With the hat inside out, use the threaded yarn needle and work a running stitch all around the top edge, going in and out through the edge stitches or visible gaps.
- Insert the needle through a gap at the top edge, come out at the next gap.
- Continue all around the circle.
- Once you’ve gone all the way around, pull the tail firmly to gather the top closed.
- The hole will pull tight and close up.
- Tie a secure knot with the long tail and any close tail for extra strength.
- For added security, sew a few more small stitches across the gathered top in different directions to fully close any tiny holes and reinforce the gather.
- When satisfied, weave the yarn down into the inside of the hat and hide it by weaving through a few stitches.
- Cut off any excess.
9: Weave in All Ends
- Thread any remaining tails onto your yarn needle.
- Weave them back and forth into the inside of the hat, following the rib lines, until secure.
- Trim the extra yarn.
10: Shape & Wear
- Turn the hat right side out.
- Fold up about 3 in (the extra length you added) to form the brim/cuff.
- Adjust the fold to your liking.
Your ribbed crochet hat is now complete and ready to wear!
Uses
- Everyday winter beanie for kids and adults
- Great gift item (simple sizing adjustments)
- Works nicely for charity projects due to easy sizing and quick make
- A good practice project for learning:
- Working in rows
- Back loop only texture
- Seaming and gathering tops of hats
Tip for Best Results
When adjusting size, always rely on measurements, not just stitch/row counts. Make your starting chain and your final rectangle width match your actual head measurements (with the recommended adjustments). This ensures a snug, comfortable fit, even if your yarn or tension is different from the tutor’s.
Conclusion
This ribbed crochet hat pattern is versatile, easy to customize for any age, and uses only simple stitches in a back loop to crochet a beautiful texture. With accurate measurements and a little patience, you’ll have a neat, well‑fitting hat that looks store‑bought and feels handmade.