How to Crochet Blouse Pattern for Modern Styles
Effortlessly crochet a trendy blouse with this Free Crochet Blouse Pattern, perfect for personalized, breathable, and fashionable outfits.
Stylish handmade clothing is easier than ever with a free crochet blouse pattern that turns simple yarn into a wearable favorite. This kind of pattern is perfect for anyone who wants comfortable, breathable tops that feel personal and unique. With clear, guided instructions, you can crochet a blouse that fits your exact style, size, and color preferences without spending much money. It’s ideal for everyday outfits, summer looks, layering over dresses, or even as a beach cover-up.
Beautiful Free Crochet Blouse Pattern & Tips for a Perfect Fit

A free crochet blouse pattern also lets beginners build confidence while learning basic stitches and structure, and gives experienced crocheters a relaxing, satisfying project. The repeatable rows and simple shaping help you enjoy the process without feeling overwhelmed. Plus, handmade blouses are thoughtful gifts that feel meaningful and special to friends or family.
Using this pattern offers both creativity and practicality: you refresh your wardrobe, use up leftover yarn, and learn valuable skills. With so many ways to customize from length and neckline to sleeves and textures; a free crochet blouse pattern becomes a go-to resource for stylish, budget-friendly fashion.

Materials Needed
- Yarn: Any yarn of your choice. The tutor recommends 100% cotton yarn, approx. 2mm thickness.
- Crochet Hook: 3mm hook.
- Tapestry Needle: For sewing and weaving in ends.
- Scissors.
- Measuring Tape: For ensuring accurate sizing.
Special Features
- Customizable Fit: Tailor the blouse’s dimensions to match your exact size, ensuring a perfect fit.
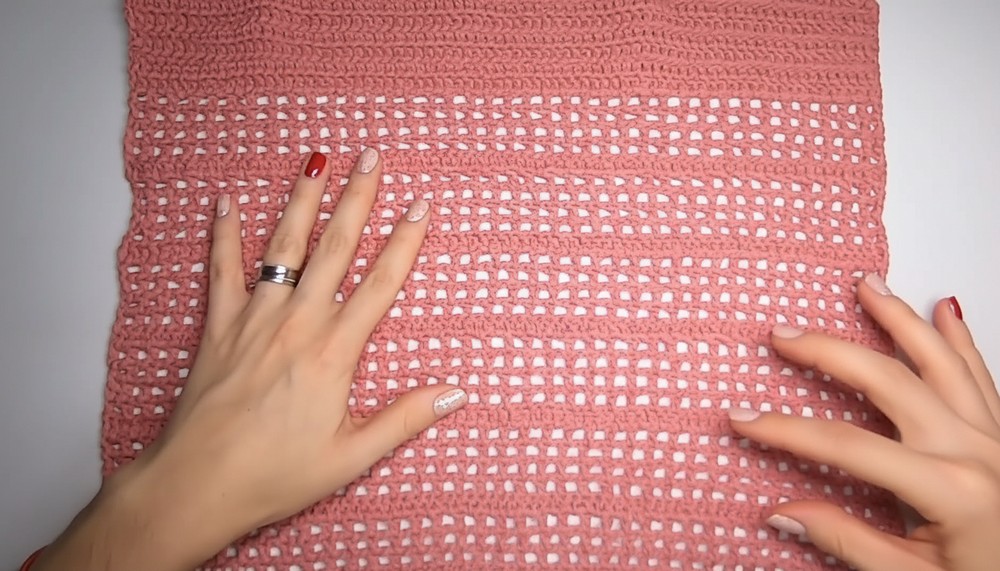
- Textured Design: Combines double crochet rows with rows of “granny square-like” airy sections for a breathable yet structured look.
- Beginner-Friendly: The pattern uses basic stitches, making it suitable for beginners with some crochet experience.
- Minimal Seams: The blouse design requires joining only the shoulders and sides, keeping the process simple.
Step-by-Step Instructions
1. Start with the Foundation Chains
- Begin with a slip knot on your hook.
- Crochet 78 chains (or adjust based on your desired width).
Tip: Keep in mind that the chains will stretch slightly when you start crocheting. Measure after completing the chain.

2. Measure the Chains
- The 78 chains measure approximately 34 cm wide, but the width can stretch to around 36 cm after the first row. Adjust the number of chains as needed for your blouse width.
3. Work the First Row in Double Crochet
- Skip 2 chains (these will count as the first double crochet of the row).
- Double Crochet (DC) into the 3rd chain from the hook and every subsequent chain across.
- You’ll have 78 stitches (including 2 starting chains).
Note: Ensure your stitches are consistent to maintain an even width.

4. Create Textured “Granny Style” Rows
For the next row:
- Chain 2 (counts as first DC), then chain 1 more for spacing.
- Skip the first stitch and DC into the next stitch. Repeat this across, alternating between skipping one stitch and chaining one.
- This creates a row of small, airy squares.

5. Alternate Rows for Pattern
- After the initial “airy row,” switch back to a full row of double crochets.
- Repeat these sequences:
- 1 row of all DCs (solid row).
- 4 rows of airy squares (alternating DC and chain spaces).

Customize the sequence as desired—e.g., 2 rows of airy squares instead of 4 for a different look.
6. Create the Desired Length
- Continue repeating the above pattern until the blouse reaches your desired length. For a medium fit, crochet 39 rows in total as follows:
- 6 sequences of 4 airy rows followed by 1 solid row.
- Finish with 9 rows of double crochets to ensure a smooth edge at the top (shoulder area).
7. Shape the Neckline
- Divide the top edge into three parts: two shoulders and the neckline in the middle.For example, if you have 79 stitches, you could leave 20 stitches on each shoulder and 39 stitches in the middle for the neckline.
- Crochet the 20 stitches for the first shoulder (using DC rows), skipping the 39 middle stitches for the neck. Leave the center unworked for the neckline and repeat the shoulder rows for the other side.

8. Add the Edging
- Once the front and back pieces are complete, create a clean edge on the blouse:
- Use single crochet (SC) stitches to work around the neckline and armholes. Insert your hook evenly around the edges to create smooth and neat borders.

9. Join the Front and Back Pieces
- Place the two blouse pieces together with the correct side facing in (wrong sides out).
- Use slip stitches to join the pieces:
- Align the shoulders and side edges.
- Work slip stitches through the inner loops of the stitches to create a flat seam.
- Leave space for the armholes when sewing the sides.

Tutor’s Suggestions
- Difficulty Level: Beginner-friendly with some experience in handling rows and alternating patterns.
- Customization: Perfect for all body types. Adjust the chain count at the start for larger or smaller sizes and increase the number of rows for greater length.
- Use Cases: Casual outings, summer wear, or layering over a camisole.
Final Tip
- While working on the alternating rows, always double-check your stitch count at the end of each row to ensure consistency throughout.
Conclusion
Congratulations! By following this pattern, you’ve completed a stylish custom-fit crochet blouse. This pattern’s simplicity and versatility make it suitable for various occasions and seasons. Pair it with jeans, skirts, or shorts for a chic and comfortable look. Your new skill is sure to impress anyone looking for handmade elegance.
Complete Remarks
This crochet blouse pattern is a classic addition to your wardrobe, offering endless styling possibilities. Its ease of creation combined with its modern appeal makes it the ideal project for both leisure crocheting and functional fashion. Keep crocheting, and have fun showing off your masterpiece.