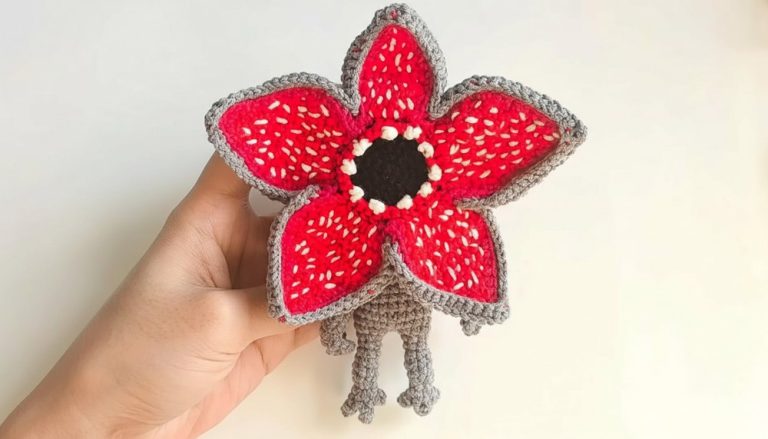
Crochet Flower Bookmark With Heart Pattern for Everyday Charm
Celebrate every page with the Free Crochet Flower Bookmark With Heart Pattern and create a delicate keepsake that makes reading even sweeter.
Delight in the charm of handmade crochet bookmarks, combining both style and practicality. A floral pattern paired with a heart accent makes it perfect as a thoughtful gift or a personal treasure for passionate readers. This lightweight Flower Bookmark With Heart pattern is not only functional but also an artistic way to add personality to your books or journals. With its soft texture and intricate detailing, it provides a sense of uniqueness that store-bought bookmarks simply can’t match. It also serves as a great way to relax and improve your crochet skills while making something useful.
Unique Crochet Flower Bookmark With Heart Pattern for Stylish Reads

This crochet project allows you to hone your skills, find relaxation, and end up with something beautiful and functional. Whether gifted or kept, the crochet flower bookmark with a heart pattern adds a special touch to every reading experience.
Materials Needed:
- Yarn:
- 4-ply acrylic yarn (Pink or any preferred color).
- Hook: 2.5mm crochet hook (use a size that matches your yarn type).
- Accessories:
- Bead (any size, for the flower center).
- Keyring (if making a keychain).
- Needle for embroidery and sewing.
- Scissors.

Special Features:
- 3D Flower Petals: The layered petals add depth and beauty to the crochet flower.
- Attached Cord: Makes it easy to use as a functional accessory like a keychain or bookmark.
- Heart Embellishment: A charming mini heart at one end of the cord adds extra detail.
- Customizable: Choose various colors for the flower, cord, and embellishments to make it unique.
Level of Difficulty: Beginner to Intermediate
The pattern uses basic crochet stitches (chain stitch, single crochet, double crochet, triple crochet, and slip stitch), making it accessible for beginners while offering a creative outlet for more experienced crafters.
Step-by-Step Pattern:
1. Magic Ring and Foundation Round:
Magic Ring:
- Leave a long tail of yarn before starting.
- Wrap the yarn twice around two fingers and cross it at the back.
- Insert the hook under the loops, pull the crossed yarn through, and secure with 1 chain stitch.
- Remove the ring from your fingers to form the magic ring.

Round 1:
- Chain 2 (does not count as a stitch).
- Work 12 double crochets (dc) into the magic ring:
- Yarn over, insert the hook into the ring, pull up a loop (3 loops on hook), yarn over, pull through 2 loops, yarn over again, and pull through the last 2 loops.
- Repeat until you complete 12 double crochet stitches.
- Pull the tail of the magic ring to close the circle tightly.
- Slip stitch into the top of the first double crochet to join the round.
- Tip: Check there are no gaps in the center.

2. First Layer of 3D Petals:
- Chain 4.
- Skip the first stitch and single crochet (sc) into the second double crochet from the previous round to create a small loop.
- Chain 2.
- Flip the work to the backside. In the loop you just made, work 10 double crochets (dc).
- Flip the work back to the right side. Secure the petal by inserting your hook into the stitch skipped earlier and work 1 single crochet (sc).
- Repeat steps 1–5 around the circle to create 6 petals.


3. Second Layer of 3D Petals:
- In the first petal loop, work 1 single crochet (sc) to start.
- Chain 4 again to begin the base of the next petal layer.
- Repeat the same petal design:
- Work 1 single crochet into the adjacent space, chain 2, flip the work, work 6 double crochets (dc) into the petal loop, flip back, and secure with single crochet (sc).
- Follow this pattern for all petal spaces on this round, completing 6 petals for the layer.

4. Cord Creation:
- Start a Chain Stitch: Work 60 chain stitches (or adjust length as desired).
- Once the chain is complete, continue with slip stitches along the backside of the chain:
- Insert the hook into each chain stitch, yarn over, pull through chain, then pull through the loop on the hook. This forms a thicker, durable cord.
- When you reach the starting point of the chain stitch, slip stitch into the base of the flower to secure it.
5. Mini Heart Embellishment:
Base Ring:
- Leave a small gap at the end of the cord to form a circle. Skip the last two chain stitches and slip stitch into the third-to-last stitch.
Heart Pattern:
- In the circle, work the following stitches sequentially:
- Chain 3.
- Work 3 triple crochets (trc) into the circle.
- Work 3 double crochets (dc) into the circle.
- Work 1 triple crochet (trc) to create the tip of the heart.
- Chain 2 and slip stitch into the center of the circle for the point.
- Repeat the same pattern in reverse for the other side of the heart:
- 3 double crochets, 3 triple crochets, chain 3, and slip stitch into the center.

Finally, fasten off the yarn and weave through ends to secure the heart to its position.
6. Finishing Steps:
Adding a Bead:
- Thread the yarn tail from the magic ring through a needle.
- Insert the needle through the middle of the flower and attach the bead at the center.
- Secure the bead by threading the yarn multiple times and tying a knot at the back of the flower.

Final Touches:
- Use the needle to weave in any remaining loose ends.
- Trim extra yarn.
- Neaten the petals or cord using your hands for the perfect shape.
Conclusion:
Your beautiful crochet flower with cord and heart is complete! This versatile design can enhance your accessories, gifts, and decorations. Its lightweight and gentle texture make it the perfect embellishment for both decorative and utility purposes.
Tutor’s Suggestions:
- Yarn Selection: Use soft and vibrant acrylic yarn for a polished look.
- Customize: Experiment with colors to personalize the flower design. Mix pastel and lively hues for a unique touch!
- Uses: Ideal for bookmarks, keychains, curtain holders, bag charms, or gift packaging.
Tip:
Be patient when working on 3D petals and slip stitches along the cord. Ensuring consistent tension will give your flower a neat and professional finish.