Stunning Crochet Mushroom Pop Amigurumi Keychain Pattern
Bring playful sophistication to your keys with the Free Crochet Mushroom Pop Amigurumi Keychain Pattern, a chic accessory full of charm.
Adorable handmade keychains are an excellent way to personalize your belongings, and a mushroom-inspired design takes it to the next level. Not only does it bring a quirky charm to your keys or bags, but it also makes for a fun fidget toy with its unique pop-up cap feature. Lightweight and easy to carry, this pattern blends functionality with a playful aesthetic, making it ideal for gifting or adding a touch of creativity to your day-to-day accessories.
Step-by-Step Crochet Mushroom Pop Amigurumi Keychain Pattern for Trendy Looks

For the best results, use a smaller-than-recommended crochet hook to keep the stitches tight and prevent stuffing from showing. Beginners will find the step-by-step approach manageable, while experienced crocheters can enjoy its charming pattern. It’s a fun, versatile project you can proudly carry or share. Use stitch markers or a paperclip to keep track of your rounds for accuracy and an even finish.
Materials Needed:
- Yarn:
- Red (for cap).
- White (for spots).
- Tan (for gills and stem).
- Black (for embroidered facial features).
- Stuffing.
- Safety Eyes or small black beads (not recommended if making for children—use embroidery instead).
- Keychain hardware:
- Jump ring.
- Keychain loop (optional).
- Tools:
- Crochet hook: 3mm (smaller than the recommended 4mm for this yarn to ensure tight stitches).
- Yarn needle.
- Stitch marker (or paper clip, scrap yarn, etc.).
- Scissors
Special Features:
- Beginner-Friendly Design: Simple stitches and techniques included.
- Fidget Functional: The cap pops up and down for stress relief or fun!
- Multi-Purpose: Use as a keychain, a cute desk accessory, or a unique handmade gift.
- Customizable: Personalize the mushroom with varied colors, facial expressions, or blush details.
Stitches Used:
- Magic Circle
- Chain (ch)
- Single Crochet (sc)
- Increase (2 single crochets in one stitch)
- Invisible Decrease (crocheting two single crochets into one stitch)
- Slip Stitch (sl st)
- French Knot (for embroidery)
Level of Difficulty: Easy (Beginner-Friendly)
Step-by-Step Pattern:
Mushroom Cap:
- Start with the red yarn for the cap and a 3mm hook.
- Make a Magic Circle and secure it with one chain (this chain does NOT count as a stitch).
- Round 1:
- Work 6 single crochets (sc) into the magic circle.
- Pull the yarn tail to cinch the magic circle closed. (Total: 6 sc)
- Round 2:
- Make 2 sc in each stitch (increase) all the way around. (Total: 12 sc)
- Use a stitch marker to mark the last stitch of the round.
- Round 3:
- Sc in the next 3 stitches, then increase in the 4th stitch. Repeat this sequence 3 times. (Total: 15 sc)
- Round 4:
- Sc in the next 4 stitches, then increase in the 5th stitch. Repeat this sequence 3 times. (Total: 18 sc)
- Round 5:
- Sc in the next 2 stitches, then increase. Repeat this sequence 6 times. (Total: 24 sc)
- Rounds 6-7:
- Work 1 sc in each stitch all the way around to maintain the total stitch count at 24.
- Fasten off:
- Cut the yarn, leaving a long tail for future use, and weave in the ends. The cap is now complete!


White Embroidered Spots (French Knot Technique):
- Use white yarn and a yarn needle.
- Mark the locations of your spots on the mushroom cap using pins.
- For each spot:
- From the inside of the cap, push the needle to the marked spot. Leave a small yarn tail inside.
- Wrap the yarn around the needle 2-3 times.
- Insert the needle back into the same hole and pull through to form a French knot.
- Repeat this process for all spots.
- Secure the white yarn’s ends by tying a knot at the back of the cap, then tuck them inside.

Mushroom Gills:
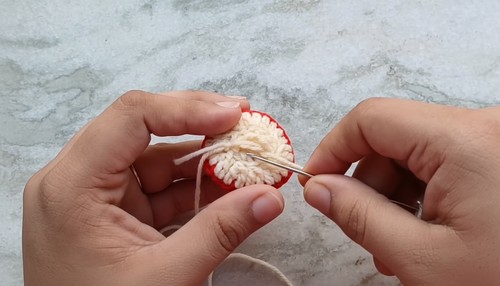
- Using tan yarn, focus on the back loops (BLs) of the last round of the cap.
- Round 1: Work 2 double crochets together (dc2tog) in the BLs only of every stitch around. (Total: 12 stitches)
- Slip stitch to the first BL to join the round.
- Round 2: Make invisible decreases in the BLs of every stitch around. (Total: 6 stitches)
- Fasten off, leaving a long tail for sewing.
- With the tail and a yarn needle:
- Weave the yarn through the front loops of the last round.
- Pull tightly to cinch the opening closed.
- Secure by weaving the tail into the gills.
Mushroom Stem:
- Using tan yarn and working into the 12 front loops you left unworked on the cap:
- Round 1: Work 1 sc in each front loop around. (Total: 12 sc)
- Round 2: Work 1 sc in each stitch to maintain the stitch count. (Total: 12 sc)
- Round 3: Sc in the next 3 stitches, then increase in the 4th stitch. Repeat this sequence 3 times. (Total: 15 sc)
- Round 4: Same as Round 3, but with 4 sc and 1 increase. Repeat 3 times. (Total: 18 sc)
- Round 6: Work 1 sc in each stitch all the way around. (Total: 18 sc)

Stuffing and Closing the Stem:
- Insert stuffing into the stem before the next steps.
- Round 7:
- Sc in the next stitch, then invisible decrease in the next two stitches. Repeat this 6 times. (Total: 12 sc)
- Round 8:
- Invisible decrease in every stitch all the way around. (Total: 6 sc)
- Fasten off, leaving a tail for sewing.
- Thread the tail through the front loops of the last round, pull to close the opening, and weave the tail into the stem.
Facial Embroidery (Optional):
- Using black yarn (separated into 1 ply), embroider a smile on the stem between Rounds 4-5.
- For a French knot stitch: Create symmetrical eyes just above the smile or use safety eyes for a polished look.


Keychain Addition (Optional):
- With a jump ring, attach the looped keychain to the center top of the mushroom.
- Secure by tightening the jump ring using pliers.
Conclusion:
Your adorable mushroom amigurumi is ready. Whether you use it as a keychain, desk decor, or fidget toy, it’s sure to spread smiles wherever it goes. This project is beginner-friendly but allows for endless creativity with colors, details, and accessories.
Tips for Success:
- For tighter spots and texture, wrap yarn twice or thrice during the French knot stitches.
- If gifting to children, avoid glued-on eyes and opt for safety eyes or full embroidery.
- To ensure neat stitches, work with a slightly smaller hook size than your yarn recommends.