
How to Crochet Sandwich Pattern for Good Looks and Fun Decor
The Ultimate Crochet Sandwich Pattern You’ve Been Waiting For

The lightweight nature makes it easy to carry, while its compact pattern ensures it doesn’t take much time to crochet. Using simple stitches like single crochets and basic increases, this pattern is approachable, yet keeps the end result polished and professional. It’s also a wonderful introduction to shaping and finishing techniques, learning how layers come together to form a three-dimensional item.
Beyond being fun, projects like these let you unwind while experimenting with yarn and colors—giving you something unique to enjoy or share. Whether displayed proudly or turned into functional accessories, this sandwich pattern holds the perfect balance of charm, practicality, and creative satisfaction.
Materials Needed
- Yarn:
- Milk Cotton Yarn (50g or 125g options)
- Colors: White or cream (bread), brown (crust), pink (blush), yellow (bow), and black (details).
- Crochet Hook: Size 2.5mm.
- Polyfill/Batting: Small amount for stuffing.
- Tools:
- Yarn needle (for sewing parts together)
- Scissors
- Optional: Keychain ring and hot glue for decoration.

Special Features
- Two-layer bread slices: Both front and back are crocheted separately, adding depth and detail.
- Personal touches: Customize the bow’s color and style, and optionally add a keychain ring.
- Cute details: A small embroidered face takes the project to a charming level.
Step-by-Step Crochet Pattern
Bread Base
Difficulty Level: Beginner-Friendly
- Foundation Chain:
- Create a chain of 12 stitches using the white yarn (bread color).
- Skip the first stitch and begin crocheting into the second chain.
- Row 1:
- Single Crochet (SC): Crochet 11 SC stitches along the chain.
- Refer to the pattern repeated above to ensure consistent stitch placement.
- Rows 2–8 (Creating the bread slice):
- Chain 1 (for turning), rotate the project, and crochet 11 SC in each row.
- Pull excess yarn through the stitches or hide them within the project to ensure clean results.
Suggestion: If you prefer a clean border, keep excess yarn tucked and crochet over it to hide it neatly.


Adding Toasted Crust
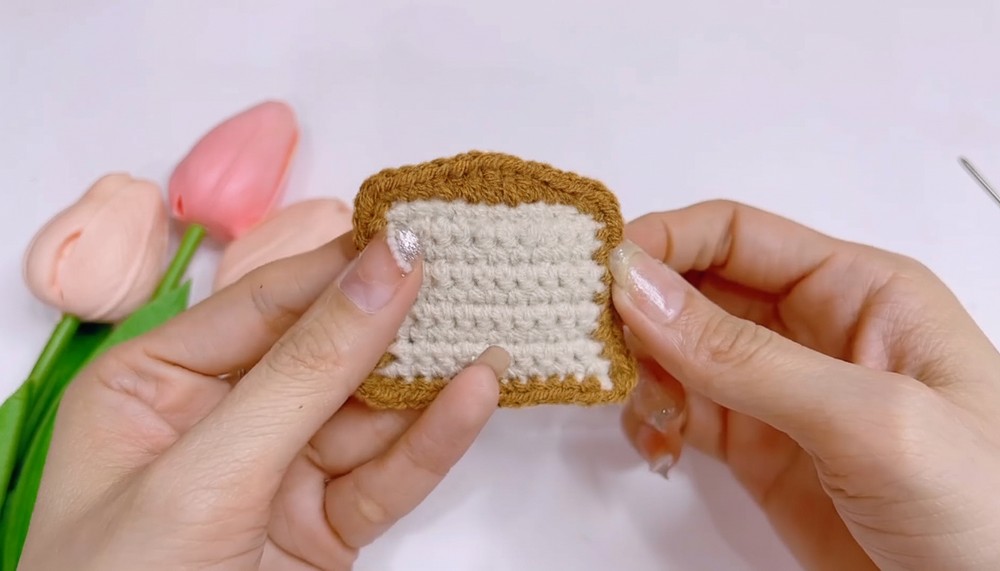
- When 8 rows are complete, attach the brown yarn (crust color).
- Crochet along the edges to create a finished crust effect:
- Start with a W increase (3 SC into one stitch) at the corners.
- Crochet 8 SC along the sides and ensure each corner has 1 W stitch (3 SC in the same stitch) for rounded edges.


Creating the Second Slice
- Repeat the steps above to make an identical bread slice for the back.
- Leave a long tail on the second slice so you can sew the front and back together later.
Sewing the Bread Slices Together
- Place the slices together face-to-face (right sides outward).
- Use a yarn needle to stitch the slices through the outer ridges, ensuring visible neat seams.
- Stuff lightly with polyfill/batting before completely sewing around to give the sandwich a slightly puffed, realistic look.
-
- Tip: Avoid overstuffing to maintain the flattened “sandwich” appearance.
Adding Accessories
Tutor’s Suggestions: These details add personality to the sandwich and level it up to giftable status!
- Bow:
- Using yellow yarn, create 2 chains, then crochet 3 double crochets (DC) in the same stitch, followed by 2 chains.
- Slip stitch into the base chain to complete one bow loop. Repeat for the second loop.
- Sew or glue the bow into one corner of the bread.
- Blush (Pink Circles):
- Use pink yarn to crochet a magic ring with 6 SC stitches.
- Pull tight and sew the blush circles to either side of the sandwich face.
- Eyes:
- Using black embroidery floss or yarn, stitch tiny dots into place. Alternatively, use stick-on eyes.
- Mouth:
- Stitch a small V shape using black yarn in the center of the face to create a cute smile.


Uses
- Keychain Accessory: Add a ring to the corner to hang on bags, keys, or zippers.
- Decoration: Display on your workspace, car, or shelves.
- Gifting: This handmade pattern makes a charming gift for friends or loved ones.
Tip for Success
To maintain neatness, hide all excess yarn tails by weaving them into the backside of your project. This ensures the finished item looks polished and professional. Use thin cotton yarn for smaller details to avoid bulkiness in features like the blush or bow.
Conclusion
The crochet sandwich pattern is a fun, satisfying project that turns simple stitches into an adorable handmade item. With its cute face, customizable pieces, and light stuffing, it’s guaranteed to be a crowd-pleaser. Whether you’re crocheting it for decor, gifting, or accessorizing, this project is sure to brighten your day.


