Free Crochet Handbag Pattern That Combines Beauty & Function
Learn Elegant Crochet Handbag Pattern for Fashion Lovers

The pattern encourages experimentation, letting you play with colors, patterns, and textures to match your taste or seasonal trends. Beyond its visual appeal, crocheting your own bag promotes eco-friendliness by shifting away from disposable options. Plus, working through the calm repetition of stitches isn’t just about creating—it’s also a relaxing way to spend time while producing something valuable.
This pattern isn’t just about utility; it bridges the gap between creativity and practicality, giving you an opportunity to learn and improve a timeless skill. Whether you keep it for yourself or share it as a cherished gift, this crochet pattern is a beautiful example of turning simple materials into something meaningful and enduring.
Materials Required
- T-Shirt Yarn: 250g (Châu used this for a Korean-style textured finish).
- Crochet Hook: 10mm.
- Accessories: A button for bag closure and a yarn needle for sewing.
- Additional Tools: Stitch marker, scissors.

Special Features
- Easy for beginners (major stitch: single crochet – “mũi móc đơn”).
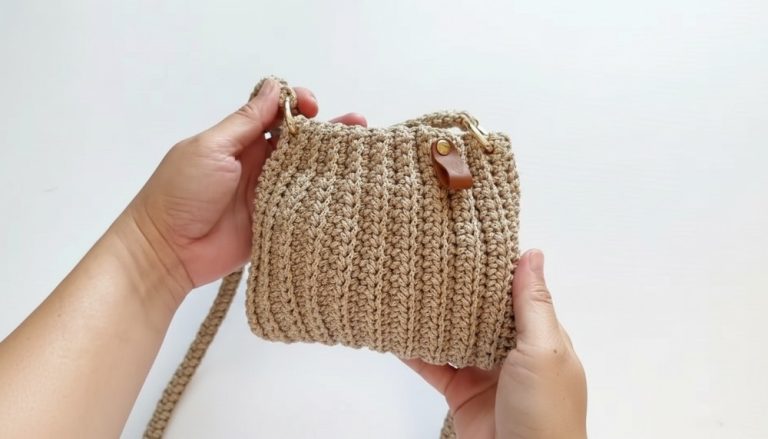
- Stylish small handbag with Korean-inspired minimalistic design.
- Includes decorative elements like a button for closure.
Step-by-Step Crochet Pattern
Part 1: Bag Base (Roughly 5 Rows)
- Foundation Chain
- Make a slip knot and chain 7 stitches. Crochet loosely for flexibility.
- Row 1
- Chain 1 to turn.
- Work into the first chain stitch: 2 single crochet (SC) at the first stitch as an increase.
- Crochet along the middle 5 chains with 1 SC each.
- At the final chain stitch, crochet 3 SC in the same stitch (this rounds one side of your base).
- Work 1 SC per chain along the other side of the foundation chain until reaching the first stitch marker.
- At this marked stitch, place 1 SC to finish rounding off the base.
- Slip stitch to close the row.
- Row 1 complete with 16 stitches total.
- Row 2
- Chain 1 to turn. Increase the beginning by placing 2 SC in each of the first 2 stitches.
- Crochet 5 SC across the straight side.
- On the curve (around the opposite edge), place 2 SC in each of the next 3 stitches for rounding.
- Continue 1 SC across 5 stitches on the other side, and increase by placing 2 SC in the final stitch.
- Slip stitch to close. Row 2 complete with 22 stitches total.
- Row 3–5 (Repeating the Designed Increase)
- Continue a similar approach for these rows while gradually increasing in the rounded corners to achieve the oval base.
- By Row 5, you should have a completed oval base with smooth edges and 40 stitches.


Part 2: Bag Body (Rows 6–13)
- From Row 6, cease any increases:
- Chain 1 to turn. Crochet 1 SC in each stitch for a total of 40 stitches per round.
- Slip stitch to join at the end of each row.
- Repeat rows 6 to 11, maintaining 1 SC per stitch. This will create the height of the bag body.
- Row 12: Start decreasing the stitches slightly:
- Chain 1 to turn. Place 1 SC in the first 3 stitches, then SC 2 together for the next 2 stitches to reduce. Repeat around the row.
- You should have 34 stitches at the end of this row.
- Row 13: Work 1 SC per stitch for added bag stability. Slip stitch to end.

3: Handles (X2)
- Handle Attachment
- Mark positions for two handles using stitch markers. For symmetry, the handles should sit on opposite ends of the circular top. Measure around 6 stitches wide for each handle placement.
- Handle Rows
- Start at the marked stitch by attaching yarn.
- Row 1:
- Chain 1 to turn. SC in the first two stitches, then SC 2 together to decrease at the end of the handle width.
- You will have 6 stitches at the end of the row.
- Row 2–13: Continue crocheting 1 SC per stitch to form the length of the handle. Slip stitch and fasten off. Repeat for the second handle.
- Final Assembly of Handles
- Use a yarn needle to sew the two free ends of each handle together, ensuring a sturdy grip when holding the bag.


Part 4: Adding Closure
- Mark the center top of the bag opening. Attach a decorative button here securely using yarn.
- Create a crochet loop close to the opposing edge by chaining enough stitches to comfortably loop over the button as a closure. Fasten the loop securely in place.

Uses and Benefits
- Practical Design: Perfect for holding small personal belongings like phones, wallets, or makeup.
- Stylish Factor: The Korean-inspired simplicity makes it a must-have accessory for casual outings.
- Gifting Opportunity: Make this for friends or family as a meaningful handmade gift.
Tips for Success
- Choose a soft yet sturdy yarn like T-shirt yarn for durability and texture.
- Use stitch markers to avoid confusion, especially during increases and decreases.
- Keep tension consistent, especially while decreasing stitches around the handles.
Conclusion
Congratulations! Your small Korean-style handbag is now complete. This cute, modern pattern is beginner-friendly yet versatile in its functionality and style. Whether you’re using it to carry essentials or as a thoughtful gift, this crochet bag pattern is sure to turn heads.