
10 DIY Chuck Box Plans
A DIY chuck box, or a camp kitchen or grub box, is a portable storage unit that helps you keep your cooking gear organized and easily accessible during camping or outdoor trips. By following various DIY chuck box plan options, you can create a customized and handy chuck box that meets your specific needs. The 10 DIY Chuck Box Plans provide clear instructions, including materials and tools needed, while offering flexibility in terms of size, design, and functions.
DIY Chuck Box Plans

A picnic is a perfect way to get some comfort and recharge after a heavy schedule, and no picnic is complete without a Chuck Box. If you plan to enjoy some fun cooking time with your family in the soothing environment of the seaside or mountains, these DIY woodworking ideas are perfect. Whether you need a table for storing your cooking gear and other materials, a station to serve food or a compact and portable solution for one person or a van, these DIY projects perfectly blend these features. So, get inspired by these incredible ideas, gather the essentials, and start preparing a portable kitchen that will be your companion for outdoor outings for years.
Chuck Box Camp Kitchen Design
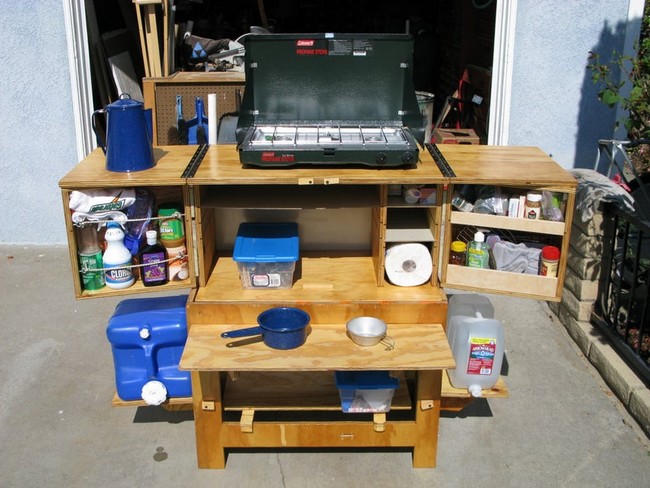
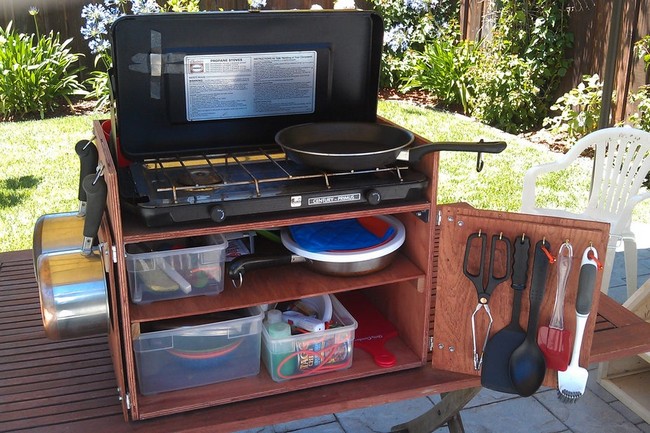
The Chuck Box Camp Kitchen is a complete answer to all your outdoor cooking needs. The box puts all your cooking things in one neat, small space while remaining portable. You can carry it in the back of your truck, and when you get to the campsite, it opens up to give you more space to work.
To construct a Chuck Box Camp Kitchen, start by designing a functional box that can hold all cookware, increase storage space, and hold water containers. The top panels should fold out, supported by swing-out doors containing extra storage. Adjustable shelves are included to utilize space effectively. Next, design a folding stand that fits with the kitchen box. Remember to design it in a way that the stand can fold down for portability. Lastly, build the box and stand carefully, keeping collapsibility and expansion in mind. Make sure to prefit everything before assembly.
Materials:
- Camp Chef Everest two-burner camp stove
- sanded plywood
- Countersunk screws
- Wood glue
- flat pine trim (a small scrap)
- non-mortise, butt hinges in antique brass
- Hook and staple latches
- Varathane One Step Water-based Stain and Polyurethane (in Honey Pecan)
- Clearwater-based polyurethane
Chuck Box

Let’s enjoy camping while savoring the food made with this Chuck Box Camp Kitchen. Although it is slightly heavy due to core plywood construction, you have the option to opt for lighter-weight wood. It is capable of storing all your camping goods and promises several years of durability.
First, design the chuck box around the specific kitchen items to be stored. Cut the 1/2″ plywood with a circular saw, ensuring precise cuts. Assemble the box with countersunk screws and wood glue. Create inset doors for both compartments, using hinges with an antique brass finish. Add hook and staple latches to secure doors. Create cut-out handles for doors and sides for easy transport. Finish the box by sanding and applying water-based polyurethane. Place the chuck box within an opening in the cabinets without any restraints.
Materials:
- Camp Chef Everest two-burner camp stove
- sanded plywood
- Countersunk screws
- Wood glue
- flat pine trim (a small scrap)
- non-mortise, butt hinges in antique brass
- Hook and staple latches
- Varathane One Step Water-based Stain and Polyurethane (in Honey Pecan)
- Clearwater-based polyurethane
Vanlife Removable Chuck Box
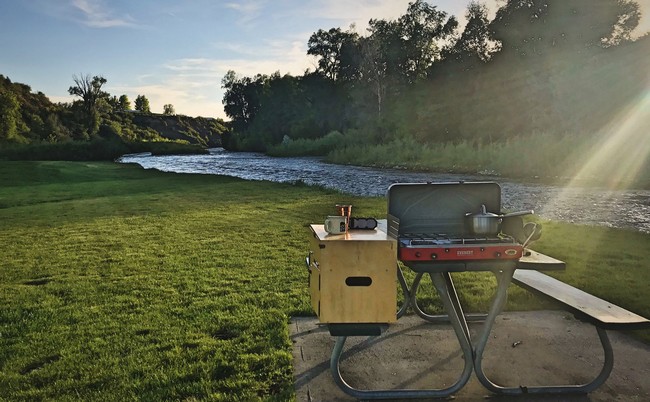
Make this DIY chuck bx that perfectly accommodates a camp stove and cookware, transforming your van into an on-the-go kitchen. Its standout feature is its removable nature, which allows you to detach the chuck box and carry it to a picnic table for an outdoor cooking experience.
Start by designing the chuck box around your specific kitchen items. Cut and assemble the box, create inset doors for compartments, and add antique brass finish latches. Include cut-out handles for easy transport. Finish through sanding and applying polyurethane. Simply place the removable chuck box into an open cabinet space, unrestrained, and it’s ready for use.
Materials:
- Camp Chef Everest two-burner camp stove
- sanded plywood
- Countersunk screws
- Wood glue
- flat pine trim (a small scrap)
- non-mortise, butt hinges in antique brass
- Hook and staple latches
- Varathane One Step Water-based Stain and Polyurethane (in Honey Pecan)
- Clearwater-based polyurethane
Camping Chuck Box
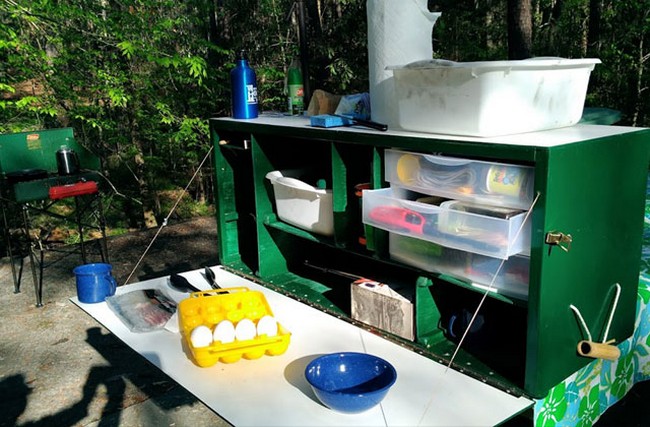
Here’s a DIY solution for organizing and simplifying your tent camping kitchen. This portable and compact camp kitchen measures 3.5 feet wide, 16 inches deep, and 18 inches tall, making it sizable yet minivan-friendly. It features a fold-down front panel with a formica surface, providing an easy-to-clean cooking or serving area.
First, list your camping equipment and note their dimensions. Use a 3D design software to arrange items for efficient storage in a rectangular chest format. Create shelves and dividers for better organization, and position heavier items at the bottom. Construct a frame; attach a formica-surfaced top and fold-down front panel on a piano hinge. Secure feet to elevate the box and protect it from moisture. Apply a water-resistant paint. Optional: add handles for easier carrying.
Materials:
- 6 wood screws
- wood
- pan head wood screws for the hardware
- Good quality carpenters glue
- Exterior Acrylic Paint (Topcoat) semi-gloss
- Latex Primer (Basecoat, with a color match to topcoat)
- Copper enamel spray paint (opt)
- Exterior water-based acrylic polyurethane
- Chest or cabinet hardware
Deluxe Camp Chuck Box Glamping Style
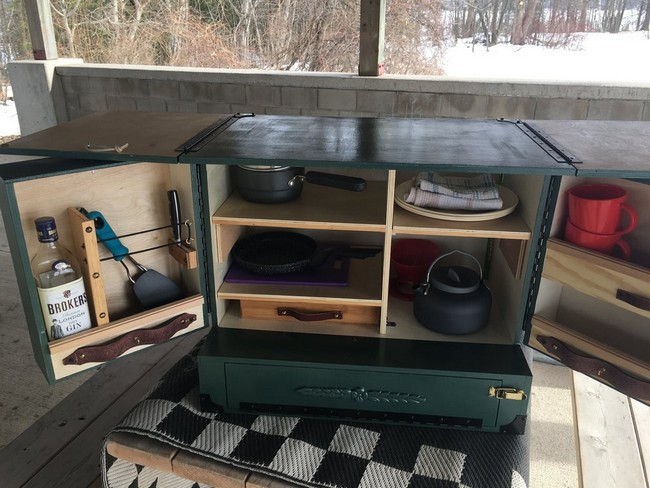
This important camping item has a unique design. It has a foldout top for many workspaces and clever storage for camping kitchen tools like a stove and utensils. Even though it looks small, the chuck box can open three doors at the front and one door at the back, and it has smart storage places. This makes sure your camping trip is tidy and organized.
Begin by constructing the basic box with a top, bottom, and two sides. Create and attach the front stove door, back door, and fold-out top shelves. Build two identical front cupboard doors, and attach them using hinges and clasps. Install shelves using cut-to-fit cleats and plywood, along with a vertical divider. Attach handles for easy portability. Paint the chuck box as desired, apply a water-resistant finish, and add decorative hardware to enhance its appeal.
Hardware and Other Supplies
- 6 wood screws
- wood
- pan head wood screws for the hardware
- Good quality carpenters glue
- Exterior Acrylic Paint (Topcoat) semi-gloss
- Latex Primer (Basecoat, with a color match to topcoat)
- Copper enamel spray paint (opt)
- Exterior water-based acrylic polyurethane
- Chest or cabinet hardware: 6 outside decorative corner brackets, 4 brass spring clasps, 2 chest handles, 4 – 24” piano hinges, 2 cabinet pulls, one small brass barrel bolt, 4 small screw eyes, approx. 30″ of a small chai
Ultimate Camp Box
Consider the Ultimate Camp Box, a new idea for the usual camping chuck box to make cooking easier. This box has two special parts, a top that’s open for simple stove use and front doors that open to the side to reach the stove better. Made with half an inch of plywood, this box is light and great for one person to carry.
Initiate by constructing an H-shaped box with a bottom piece, using brackets and screws. Apply a protective stain to the plywood. Attach the top shelf, the bottom piece, and the back panel with brackets. Add side-opening front doors with hinges. Attach handles for easy transport. The box design emphasizes an open top for quick stove access, shelves sized specifically for your items, and side hooks to hang utensils and pots.
Tools:
- Table saw
- Mitre saw
- Scroll Saw
- Drill and bits
- Sandpaper
- small hand plane or block sander
- Pin Nailer and pins
- Misc. clamps
- Fine Hand saw
- #1 Robertson and a Small Philips screwdriver
- Carpenters square
- A third hand
Camping Chuck Box
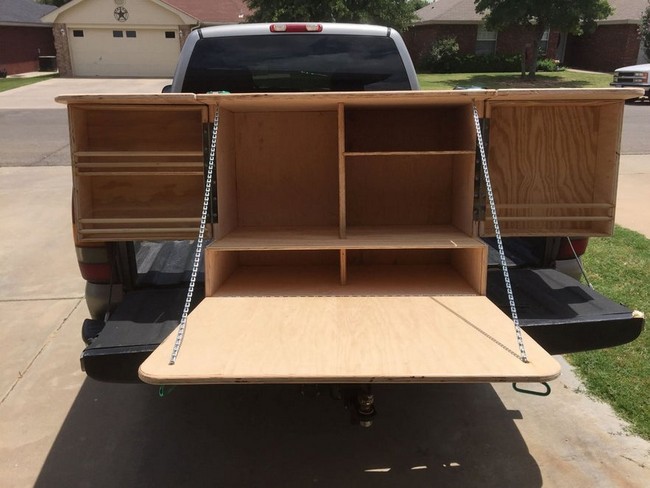
This Camping Chuck Box DIY activity is a fun project for people who like cooking while camping. It has a top that can open for more space, and it also has cabinets that can swing out. Even though it has a lot of room, it’s still easy to carry around when you’re traveling.
Measure your camping equipment for your custom design. Construct the main box and inner shelves according to these measurements, ensuring that the box accommodates your items. Then, build the cabinets using cutouts from the main box sides, adding a mid-shelf in one if necessary. Incorporate recessed handles, ensuring they won’t obstruct cabinet swing or top flaps. After routing edges, assemble the box and shelves. Create top flaps and a front opening, ensuring a snug yet seamless fit. Add supports and clasps for stability and security, considering how cabinets and flaps interact in the final design.
Materials Needed:
- Sheet and a half of 3/4 inch Plywood
- Half a Sheet of Plywood
- Box Screws
- Drywall Screws
- Heavy-Duty Recessed Handles
- New Circular Saw Blade
- Metal chain for the front supports
- Hinges
- Carabiners
- Dowel Rods,
- Paper Towel Holder
Chuck Box Plans
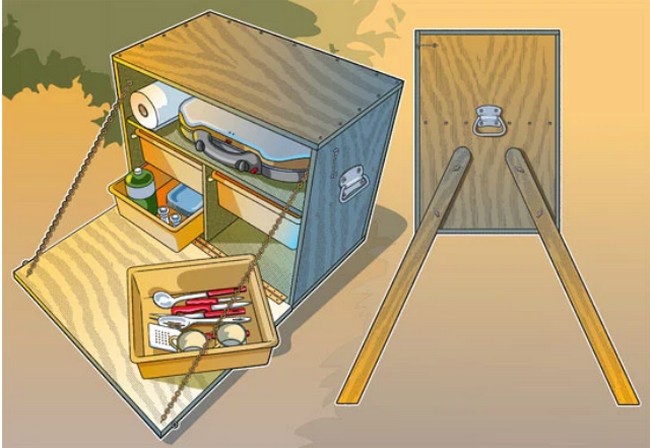
The DIY Chuck Box from Scout Life is designed to make camp cooking easier and more convenient. This portable kitchen box can store your cooking gear while providing a stable working surface for meal preparations.
Decide the size of your box based on your camping gear. Cut the plywood pieces and sand them, followed by primer and paint application before assembly. Screw and glue the box together, ensuring a clean finish through predrilled holes and countersinking. Attach a painted door using a piano hinge. Determine and fix the positions of the eye screws and swing hooks. Attach trunk handles for extra strength. Fill the box with your gear, and it’s ready for use. You can add detachable legs to elevate the box for easy access if needed.
Materials Needed:
- Camp Chef Everest two-burner camp stove
- sanded plywood
- Countersunk screws
- Wood glue
- flat pine trim (a small scrap)
- non-mortise, butt hinges in antique brass
- Hook and staple latches
- Varathane One Step Water-based Stain and Polyurethane (in Honey Pecan)
- Clearwater-based polyurethane
REI’s Camp Kitchen Chuck Box Plan
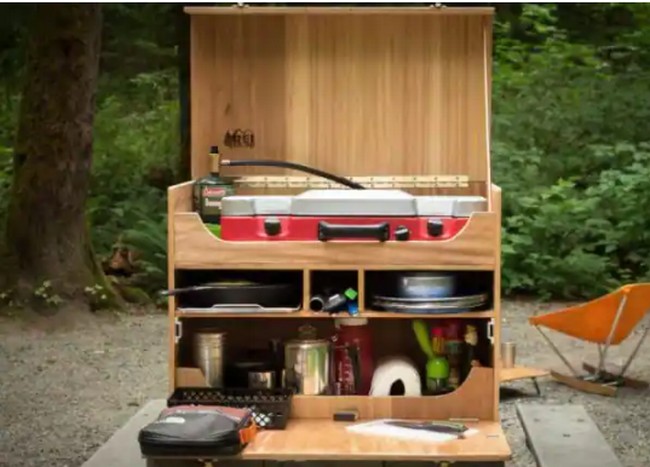
If you want things to be tidy and easy on your camping trips, this DIY Camp Kitchen Chuck Box can be your best friend. It doesn’t just give you a helpful way to keep track of your cooking stuff, but also its friendly design and shiny wooden look will wow your camping friends.
First, measure your gear to determine the dimensions of your box. Layout your measurements on the plywood sheet and start cutting. Mark your shelf height, then assemble the box sides and back. Attach the bottom, preassemble your shelves outside of the box, then install them using the pre-marked lines. Attach the top to the box and hinges to the top and front face. Install any remaining hardware, sand all edges round, and seal the plywood. Post pictures of your completed camp kitchen, and enjoy camping!
Materials Needed:
- Camp Chef Everest two-burner camp stove
- sanded plywood
- Countersunk screws
- Wood glue
- flat pine trim (a small scrap)
- non-mortise, butt hinges in antique brass
- Hook and staple latches
- Varathane One Step Water-based Stain and Polyurethane (in Honey Pecan)
- Clearwater-based polyurethane
Yack Box Compact Lightweight Chuck Box
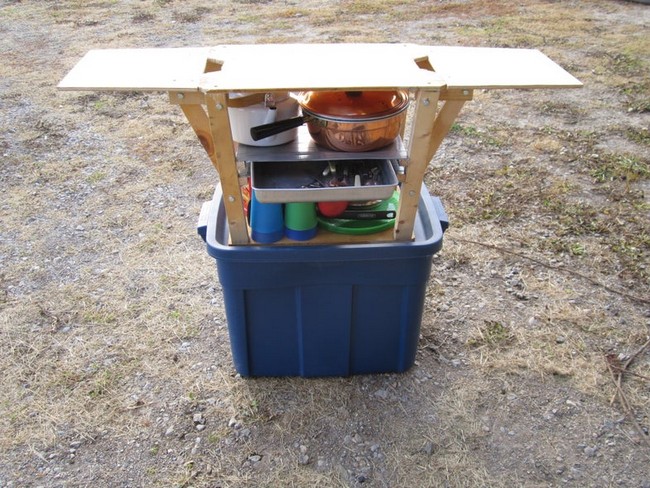
For a versatile and compact camping solution, try the YACK BOX. This innovative DIY project offers a range of features designed to make your outdoor cooking experiences more enjoyable, including its rain-tight construction, space for washing dishes, and a place to wash up after cooking.
Get your portable kitchen ready by cutting a bottom piece for the inner frame and the top piece. Next, cut the side styles and screw the top and bottom pieces to the side styles. Cut the shelf hinges, two side shelves, and the shelf support struts. Assemble the side shelves, add the shelf strut, and create duct tape and plastic bag shelves. Screw the duct tape webbed shelves to the insides of the styles. Finally, paint and prepare your camp kitchen for use.
Materials Needed: For more information about materials, tools, and step by step guide, visit the link below:


